There is also one other feature that you may want to turn on is the brim feature, it the extra printed line at boundary object you are printing. The main purpose is to extrude the first few inch of plastic so that it have a better consistency when printing actual object. See the picture below:
Once you download the software and run it, you will see setup screen:
Next is to select the Firmware type, if you using the diy reprap, it should be "RepRap (Marlin/Sprinter/Repetier)" unless you use other firmware.
Next is to set the print bed size. Normal is 8"by 8" or 200 by 200mm.
Next is to set the Nozzle diameter, for my case, I use 0.35mm. Make sure you are setting to the right number.
Next is to set the filament Diameter. it either 1.75mm or 3mm.
Next is Extrusion Temperature. You may need to play with this number later on. I use 240c for ABS. Note that this may melt your hotend if you are not careful. Buy full metal hotend if possible. J-head is just too much pain if you using ABS.
Next is to setup the heat bed temperature. I use 100c for ABS, but sure to use Kapton tape so that it help part stick well to the bed. Will go into detail in one of my future post.
You have setup your printer!!

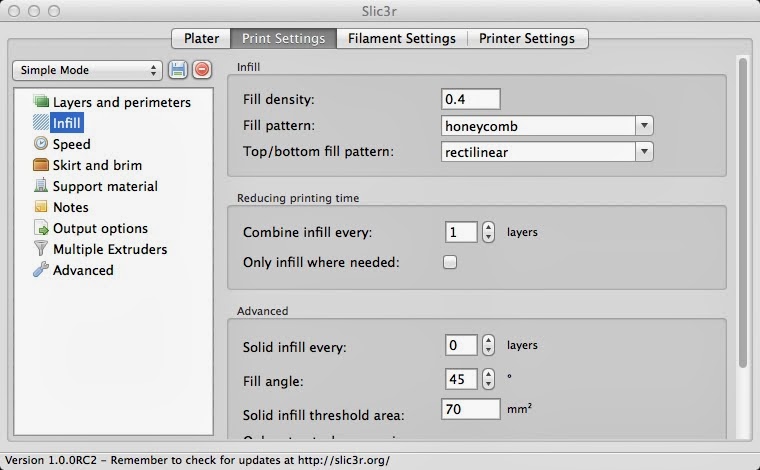
Will go through the detail setting in my next update, for now, I'm going to show you where you set the print fill structure setting. Goto "Print Settings" --> Infill --> Fill pattern, select "honeycomb"
And for the brim, goto "Print Setting" --> "Skirt and brim" --> "Brim width". Just use 2mm.
I hope you like this work through, next I will go into more detail on each of the options using in slic3r.


No comments:
Post a Comment